
Have you ever tried to merge cells in Excel without losing data, only to watch in horror as your carefully entered data just… vanishes?
You’re not alone. This happens to Excel beginners every single day, and it’s incredibly frustrating.
The worst part? Excel doesn’t even give you a proper warning until it’s too late.
But here’s the thing: you don’t actually have to lose any data. You just need to understand what Excel is really doing when you click that “Merge & Center” button and learn the safer alternatives that professional Excel users rely on.
In this guide, I’ll walk you through everything you need to know, step by step, in plain English. No confusing jargon, no assumptions about what you already know.
Let’s make sure you never lose data to a merge again.
What Actually Happens When You Merge Cells in Excel
Before we talk about solutions, let’s understand the problem.
When you select multiple cells in Excel and click Merge & Center, Excel does something that seems simple on the surface—but it’s actually making a destructive choice behind the scenes.
Here’s What Excel Does:
- It creates one large cell that spans the area where your original cells were
- It keeps only the value from the top-left cell
- It permanently deletes everything in all the other cells
Let’s say you have this data:
| Column A | Column B |
|---|---|
| John | Smith |
| Sarah | Johnson |
If you select both cells in the first row and click Merge & Center, Excel will:
- Keep “John”
- Delete “Smith” completely
- Create one merged cell that just says “John”
The Warning You Might Miss
Excel does show a warning, but many people click through it without reading:
“Merging cells only keeps the upper-left cell value, and discards the other values.”
By the time you see this message, if you click “OK,” your data is already gone. And if you have multiple rows of data, you might not even notice until much later.
Why This Causes Bigger Problems
Merged cells don’t just delete data, but they break Excel’s functionality:
- Sorting becomes impossible (Excel can’t sort rows with merged cells)
- Filters stop working properly
- Formulas get confused and return errors
- Copy-pasting becomes unpredictable
- AutoFill stops working in those columns
This is why experienced Excel users almost never use the Merge & Center button for actual data.
What You Probably Actually Want to Do
Here’s an important realization: most people don’t actually want to merge cells, they want to combine the data in those cells.
There’s a big difference:
- Merging cells = Making multiple cells look like one cell (visual only, deletes data)
- Combining data = Taking the content from multiple cells and putting it together in one place (keeps everything)
Common Examples Where You Want to Combine (Not Merge):
- Combining first and last names: “John” + “Smith” = “John Smith”
- Creating full addresses: “123 Main St” + “New York” + “NY” = “123 Main St, New York, NY”
- Merging product codes: “PROD” + “12345” = “PROD-12345”
- Joining date parts: “2024” + “12” + “25” = “2024-12-25”
For all of these situations, what you need is a way to combine the text from multiple cells into one cell—without losing anything.
Let me show you exactly how to do that.
Safe Methods to Merge Cells in Excel Without Losing Data
Method 1: Using TEXTJOIN (The Best Modern Solution)
Best for: Excel 365, Excel 2019, Excel 2021, or Excel for Mac 2019+
This is my favorite method because it’s powerful, flexible, and incredibly easy once you understand it.
What is TEXTJOIN?
TEXTJOIN is an Excel function that joins (combines) text from multiple cells, and lets you put something in between each piece—like a space, comma, or dash.
Step-by-Step Example
Let’s say you have this data:
| A | B |
|---|---|
| John | Smith |
| Sarah | Johnson |
Goal: Combine the first and last names with a space between them.
Here’s How:
- Click on a new cell where you want the combined result (let’s say cell C1)
- Type this formula:
=TEXTJOIN(" ", TRUE, A1, B1)- Press Enter
- You’ll see:
John Smith
Let’s Break Down That Formula:
TEXTJOIN= The function name (tells Excel you want to join text)" "= The separator (what goes between each piece—in this case, a space)TRUE= Ignore empty cells (this means if one cell is blank, Excel won’t add extra spaces)A1, B1= The cells you want to combine
Want a Different Separator?
You can put anything between the quotes:
=TEXTJOIN(", ", TRUE, A1, B1)→John, Smith=TEXTJOIN("-", TRUE, A1, B1)→John-Smith=TEXTJOIN("", TRUE, A1, B1)→JohnSmith(no space)
Copying the Formula Down
Once you have the formula working in C1, here’s how to apply it to all your rows:
- Click on cell C1 (the cell with your formula)
- Hover over the bottom-right corner of the cell until you see a small black cross (called the “fill handle”)
- Click and drag down to copy the formula to other rows
- Release the mouse, and Excel automatically adjusts the formula for each row
Now you have all your data combined—and the original data in columns A and B is still there, untouched!
Why This Method is Best:
Method 2: Using the & Symbol (Works in Any Excel Version)
Best for: Older versions of Excel, or quick one-off combinations
If your Excel doesn’t have TEXTJOIN, or if you just want something simpler, you can use the ampersand symbol (&) to stick cells together.
Step-by-Step Example
Using the same data:
| – | A | B | C |
|---|---|---|---|
| 1 | John | Smith | |
| 2 | Sarah | Johnson |
Here’s How:
- Click on cell C1
- Type this formula:
=A1 & " " & B1- Press Enter
- Result on cell C1:
John Smith
Understanding the & Symbol:
Think of the & symbol as glue. It sticks things together in the exact order you write them:
A1= First piece (John)" "= A space (the thing in the middle)B1= Second piece (Smith)
Excel reads this as: “Take what’s in A1, then add a space, then add what’s in B1.”
More Examples:
Combine three cells with commas:
=A1 & ", " & B1 & ", " & C1Result: John, Smith, New York
Add text around your data:
="Name: " & A1 & " " & B1Result: Name: John Smith
Combine without any separator:
=A1 & B1Result: JohnSmith
Why This Method is Great:
The Downside:
For combining 2-3 cells, this is perfect. For more than that, TEXTJOIN is easier.
Method 3: Flash Fill (No Formulas Needed!)
Another tool that you may use to merge cells in Excel without losing data is Flash Fill. When your data follows a consistent pattern, this can be the simplest data merging tool or function for you in Excel.
But there is one thing you should know about this tool, you cannot merge two columns if they are not close to each other. This means that you cannot use this tool to merge columns A and D. This only works with a consistent data pattern, so you will always have to be careful about this.
Best for: Complete beginners who want Excel to “figure it out”
Flash Fill is like Excel magic. You show Excel what you want once, and it automatically does it for the rest of your data.
Step-by-Step Example
Same data as before:
| – | A | B | C |
|---|---|---|---|
| 1 | John | Smith | |
| 2 | Sarah | Johnson |
Here’s How:
- Click on cell C1
- Type what you want manually:
John Smith - Press Enter to move to C2
- Press Ctrl + E (Windows) or Cmd + E (Mac) to tell Excel “do this for everything”
Excel will automatically fill in all the remaining cells with the combined names!
When Flash Fill Works Best:
The Downside:
Pro Tip: If Flash Fill doesn’t work, try typing two or three examples manually. Sometimes Excel needs more examples to understand the pattern.
Method 4: CONCAT Function (Middle Ground Option)
Best for: Excel 2016 and newer (slightly simpler than TEXTJOIN)
CONCAT is like a simplified version of TEXTJOIN. It combines cells but doesn’t have the automatic separator feature.
Step-by-Step Example
- Click on cell C1
- Type this formula:
=CONCAT(A1, " ", B1)- Press Enter
- Result:
John Smith
The Difference from TEXTJOIN:
- CONCAT: You manually add spaces and separators:
=CONCAT(A1, " ", B1, " ", C1) - TEXTJOIN: Excel adds the separator automatically:
=TEXTJOIN(" ", TRUE, A1, B1, C1)
For 2-3 cells, CONCAT is fine. For more cells, TEXTJOIN is easier.
If you are comfortable using Power Query., or dealing with huge data, then read this.
When Is It Actually Okay to Merge Cells?
We’ve established that merging cells is usually a bad idea for data. But there are a few situations where it’s acceptable or even the right choice.
Acceptable Uses for Merge & Center:
1. Creating Titles and Headers
If you’re making a report header that spans multiple columns:
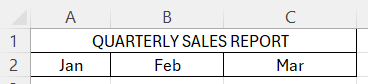
This is fine because:
- It won’t break any Excel functions
- It’s just a title, not data you’ll sort or filter
- It’s visual formatting for readability
2. Print-Only Documents
If you’re creating something that will only be printed (like a form or certificate), merging cells for layout is okay.
3. Final Presentation Worksheets
If you’re making a final, static report that won’t be edited or analyzed, visual merging is acceptable.
- First of all, to open the Find dialog box, press Ctrl + F.
- Click Options > Format > go to the Alignment tab.
- Check the Merge cells box and click OK.
- Click Find All to see all merged cells in the worksheet.
When You Should NEVER Merge Cells
The Safer Alternative: Center Across Selection
Even for titles, there’s a better option than Merge & Center:
How to Use Center Across Selection:
- Select the cells you want to center across
- Press Ctrl + 1 (Windows) or Cmd + 1 (Mac) to open Format Cells
- Click the Alignment tab
- In the Horizontal dropdown, select Center Across Selection
- Click OK
This makes your text look centered across multiple columns, but the cells stay separate, so sorting and filtering still work!
Common Mistakes That Cause Data Loss (And How to Avoid Them)
Let me walk you through the mistakes I see beginners make all the time—and how to avoid them.
Mistake #1: Clicking “Merge & Center” Without Reading the Warning
What happens: You lose data immediately, and you might not realize it until later.
How to avoid it:
- Always read Excel’s warnings—they exist for a reason
- If you see a warning about losing data, click Cancel and use one of the combining methods instead
Mistake #2: Merging Before Combining
What happens: People try to merge cells that have data in them, lose everything except the top-left value, then try to manually retype the lost data.
How to avoid it:
- Always combine the data first using TEXTJOIN, &, or Flash Fill
- Only merge cells if they’re empty or you absolutely need visual formatting
Mistake #3: Merging Cells in a Data Table
What happens: You break sorting, filtering, and any formulas that reference those cells. Your entire worksheet becomes harder to work with.
How to avoid it:
- Keep your data “clean”—no merged cells in actual data
- Use combining methods instead
- If you need visual formatting, do it in a separate “presentation” copy of your data
Mistake #4: Not Keeping the Original Data
What happens: You combine data into one column, then delete the original columns—but then you need the separated data later.
How to avoid it:
- Keep the original columns until you’re 100% sure you won’t need them
- You can hide columns if they’re cluttering your view (right-click the column header → Hide)
- Create your combined data in a new column, not by overwriting the originals
Mistake #5: Using Merge on Filtered Data
What happens: When you merge cells and then try to filter, Excel gets confused because merged cells span multiple rows.
How to avoid it:
- Never merge cells in a table you’ll need to filter
- If you need to filter, keep cells separate and use the combining methods
Troubleshooting: What to Do If You’ve Already Merged Cells
Already merged some cells and need to undo it? Here’s how to fix it.
Unmerging Cells:
- Select the merged cell
- Go to the Home tab
- Click the Merge & Center button (this toggles it off)
- The cells are now separate again
Recovering Lost Data:
Unfortunately, if you already clicked through the merge warning, the deleted data is gone. Unless you:
- Press Ctrl + Z immediately to undo
- Check your file history (File → Info → Version History) for an earlier version
This is why prevention is so important!
Cleaning Up a Worksheet with Merged Cells:
If you inherited a messy Excel file with merged cells everywhere:
- Select the entire worksheet (click the triangle at the top-left corner)
- Click Merge & Center to unmerge everything at once
- Rebuild your data properly using the combining methods in this guide
Quick Reference: Which Method Should You Use?
Here’s a simple decision guide:
| Your Situation | Best Method |
|---|---|
| You have Excel 365 or 2019+ | TEXTJOIN |
| You have older Excel | & symbol |
| You hate formulas | Flash Fill |
| You’re combining 2-3 cells | & symbol |
| You’re combining many cells | TEXTJOIN |
| You need to update data regularly | TEXTJOIN or & (not Flash Fill) |
| You just want a title to look centered | Center Across Selection |
| You need visual merge for a printed report | Merge & Center (as a last resort) |
Your Action Plan: Never Lose Data Again
Here’s what to do right now to protect your data:
Step 1: Stop Using Merge & Center for Data
- From now on, assume Merge & Center will delete your data
- Only use it for visual formatting in presentation documents
Step 2: Learn One Combining Method
- Pick the method that works best for your version of Excel
- Practice it on sample data until it feels natural
Step 3: Combine First, Format Later
- Always combine your data into a new column first
- Keep your original columns until you’re certain you don’t need them
- Only merge cells (if at all) after your data is safely combined
Step 4: Share This Knowledge
- Show your coworkers the right way to combine data
- Help prevent data loss in your organization
Final Thoughts
Here’s the truth: Excel’s Merge & Center button is one of the most misunderstood features in the entire program.
It looks like it should combine your data, but it actually just deletes most of it and creates visual formatting.
Once you understand this and learn the proper combining methods like TEXTJOIN or the & symbol, Excel becomes so much more reliable and powerful.
Remember:
- Merging = Visual only (deletes data)
- Combining = Keeps all your data safe
You now know how to do it the right way. Your data is safe, your worksheets will work properly, and you’ll never have that sinking feeling of watching your information disappear again.
If you found this helpful, practice these methods on some sample data this week. The more you use them, the more natural they’ll become and pretty soon, you’ll wonder why anyone ever uses Merge & Center at all.