
If you are working on larger data sheets, you may become frustrated by writing the same data in several rows and columns repeatedly.
Excel is an essential tool for managing and analyzing data. Among its many time-saving features, Autofill stands out as a powerhouse for automating repetitive tasks. Whether you’re populating rows of dates, copying formulas, or creating sequential numbers, Autofill simplifies your workflow and minimizes errors.
But sometimes, it doesn’t always operate as expected. In this article we will discuss the reasons why Autofill doesn’t always work as well as it should.
What is Autofill in Excel
If you’ve ever worked with Excel, you may notice a small square in the bottom-right corner of a cell. This little tool is known as the Autofill Handle. Autofill allows you to automatically fill fields with data that follows a pattern or to copy information or formulas from one cell to another. It saves a lot of time, especially when working with large datasets.
It can be used to continue a series, repeat a value, copy formulas along a column or across a row, or expand patterns such as days in a week, months, or custom lists. With Autofill, you can quickly populate hundreds or even thousands of cells, saving time and reducing manual errors.
How to Use Autofill in Excel
Let’s break it down into simple steps so that everyone can understand it and improve their data management while saving time.
Using the Fill Handle
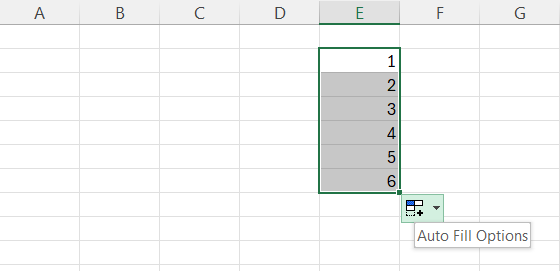
The Fill Handle is the small square at the bottom-right corner of a selected cell. It’s your gateway to Autofill magic. Let’s assume that you want to autofill numbers in an Excel sheet. To autofill, you can just follow these simple steps.
- First, type the number like 1, 2, 3 or any other number such as 12 in column C1 and the second number sequence (13) in C2.
- Now select both cells C1 and C2.
- Move your mouse to the bottom-right corner of cell C2.
- You’ll see a small square. Click and drag the square down to fill more cells.

Now you can see that the other cells are automatically filled by the next number sequences as above.
Autofilling Sequence Numbers
If you want to autofill a single value in multiple cells, follow these steps:
- Type the number you want to autofill in multiple columns, such as 14 in C1.
- Look for the plus sign on the bottom right corner of C1.
- Click on it and drag it down to other cells.
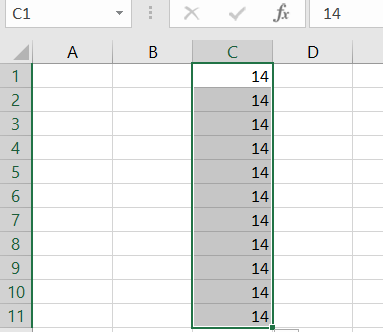
You can see from the image that the number 14 has been automatically filled in the other cells.
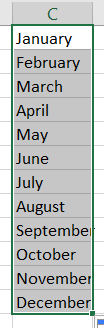
Autofilling Multiple Kinds of Data

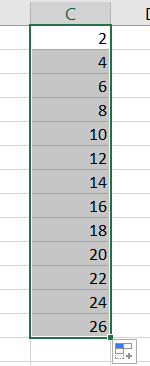

As you can see in the image above, it can easily autofill any type of text sequence, arithmetic progression sequence, and even alternate sequences in Excel.
The process is the same as we explained in the previous examples. Simply select the first two to three cells or more containing your text, numbers, arithmetic, or any other sequences.
And then simply drag down the + icon to the desired cells where you want to fill the sequences.
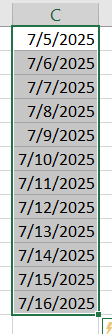
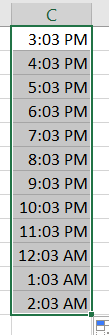
Autofill in Excel for Dates, Months, and Times
Excel recognizes patterns in dates and times, making it easy to create schedules or timelines.
Just type dates, months, and times in Excel, just like other text and numeric values and drag the Fill Handle to extend the data. Your data will be autofilled in further cells.
Advanced Options:
- Right-click while dragging the Fill Handle to choose options like Fill Days, Fill Weekdays, or Fill Months.
Autofilling Multiple Columns and Rows
If you have data in numerous cells and columns and want to autofill all of them, the autofill function can help you do that. Simply select all of the rows and columns, then drag the fill handle, and your data will be automatically filled in the other cells, as shown in the image below.

Using Autofill While Inserting Empty Cells
You can also use the autofill feature to create gaps in your data sequences. The process is also the same as the other approaches shown in the figure below.

Autofilling Formulas
Autofill doesn’t just work with numbers and text, but it’s equally as powerful for formulas.
- In cell C1, type =A1+B1.
- Hit Enter.
- Click C1 again.
- Drag the Autofill handle down.
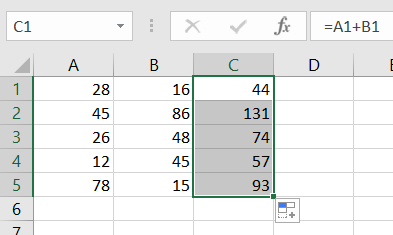
Excel will update the formula automatically in each row (e.g., =A2+B2, =A3+B3). You don’t have to re-type the formula over and over.
Using Autofill With Custom Lists
If you want to reuse the same list of products, you can create custom lists in Excel. A custom list only includes text values and text with numerical values. To do so, save the specified products and text value list as a custom list in Excel and then use the autofill feature to populate that custom list in further cells.
You can follow these simple steps to create and save a custom list in Excel.
- First, make a list of all of the products you want to add to your custom list.
- Go to File > Options > Advanced.
- Go to the ‘General’ section and select the box of ‘Edit Custom Lists’.

- Add your list (e.g., “Apple, Banana, Mango, Orange, Kiwi, Cherry”) and click OK.

- You can also choose the option to import a list from cells.

Finally, after creating the custom list, you can add it to any cell by entering the first product and dragging the autofill handle to the desired cell. Excel will then identify the custom list and populate it in the remaining chosen cells.

Flash Fill
Has it ever happened to you that after entering the first character or values in a cell, Excel provides the remaining entries or that specific value? This can sometimes happen using Excel’s Flash Fill feature.
When you enter data into Excel and then follow a pattern, Excel recognizes it. When you add the first characters of a value, Flash Fill suggests the other characters based on the pattern you followed.

As you can see in the image above, Excel displays a list of names. When you press the Enter button, all of the cells will be automatically filled with the following data patterns.
The Excel Flash Fill function allows you to easily format any type of data, including dates and times.
Simply enter the first character of any data, and FlashFill will manage the rest.
Why Doesn’t Excel Autofill Work Sometimes?
If you are using Excel and notice that your Excel autofill feature is not working, there could be a few reasons for this. So let’s investigate and try to fix them.
Things to Try First
There may be minor system or software issues that can create problems. To correct them, try these methods first.
- Restart Excel and if that does not work restart your computer.
- Check the Excel version and update it.
- Check if you have installed Excel using an illegal or cracked method. This can also cause Excel functions to not work properly.
- Check if there’s any filter on the data you have entered and then clear it.
- Replace the range of cells.
- Check if the autofill option is disabled in Excel and then enable it. To check if Autofill is enabled in Excel, go to File > Options > Advanced, then look under Editing options and make sure “Enable fill handle and cell drag-and-drop” is checked. If it’s not, tick the box and click OK to enable it.
1. Missing a Pattern
Autofill only works by recognizing a pattern. If you enter data into an Excel sheet without following the pattern or missing a value, Excel will not function properly. For Example:
- If you type 1 in cell A1 and nothing in A2, Excel won’t know if you want to continue 1, 2, 3 or just copy 1 repeatedly.
Solution:
To resolve this issue, always give Excel at least two cells to work with. For example, if you want to repeat 2, 4, 6, 8, etc., you can enter 2 and 4 in the first two cells and then use the autofill option.
Using this method, autofill will recognize and follow the pattern.
2. Formula Doesn’t Adjust Properly
If you work with formulas in Excel, you may find that autofill does not always work. Working with formulas does not change the way you expected. This often happens when you use absolute references, such as $A$1.
Example:
- In D1, if your formula is =A1*$B$1, and you Autofill down, A1 will become A2, A3… but $B$1 will stay the same.
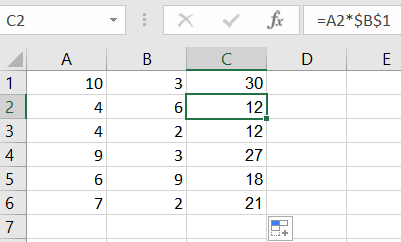
Solution:
When working with formulas, you need to use $ signs carefully and correctly; otherwise, you will produces incorrect results.
To achieve the correct results, simply use =A1*B1
In some cases, the $ sign produces correct results, and sometimes it produces incorrect results; therefore, you need to know how relative and absolute cell references work.
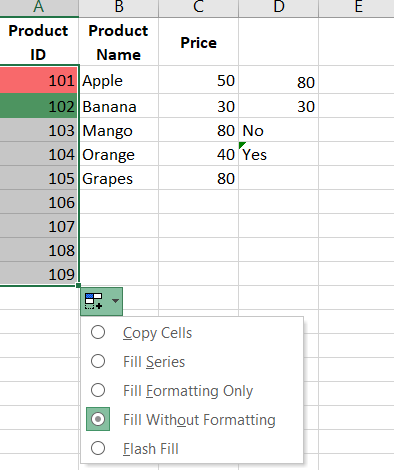
3. Formatting Doesn’t Match
Wrong formatting can also give you unexpected outcomes. If you format your starting data, the remaining data will likewise be formatted, which you don’t want. For Example:
- If A1 is bold and red, dragging the handle will make all filled cells bold and red too.
Solution:
In this case, you can use the Autofill Options button to choose “Fill Without Formatting,” which appears after you drag.
4. Excel Just Copies, No Pattern
Sometimes, after writing data, you simply drag it. In this case, Excel will just copy the data you’ve typed into the cells. For example, you typed 1, 3, 5 and dragged… but Excel keeps copying 1, 3, 5 instead of continuing 7, 9, 11.
Solution:
If this ever happens to you, then you can use the Fill Series option after dragging to tell Excel to extend the pattern.
5. Manual Calculation Mode
There is a manual calculation mode in Excel; if this is enabled, the formulas will not be properly updated, resulting in inconsistent results.
Solution:
To fix this issue, you can go to the Formulas tab > Calculation Options > and Select Automatic.
How To Turn On and Off the Autofill Feature?
The autofill handle is enabled by default, which appears when you enter data into cell ranges. If you want to turn off the autofill feature that appears every time you select a cell, follow these steps:
- Click on File (or the Office button if you’re using Excel 2007).
- Choose Options, then go to the Advanced section.
- Under the Editing options group, uncheck the box labeled Enable fill handle and cell drag-and-drop.
Once unchecked, Excel will no longer allow you to use the fill handle for dragging or AutoFill.
Show or Hide the Autofill Options Button
To hide the autofill handle in Excel, simply follow these steps:
- Go to File (or the Office button), then select Options, and proceed to the Advanced tab.
- Navigate to the section labeled Cut, Copy, and Paste.
- To hide the AutoFill Options button, uncheck the “Show Paste Options” button when content is pasted.
Once disabled, the Auto Fill Options icon will no longer pop up after you drag the fill handle.
Wrap Up
Excel Autofill is a time-saving feature that helps you quickly populate data, formulas, and patterns. Once you know how to utilize Autofill in Excel using the Excel fill handle, repetitive tasks become much easier.
However, if Excel Autofill is not working, it’s often due to a missing pattern, wrong formula references, or disabled settings. Use the tips in this guide to troubleshoot issues and make the most of this powerful tool.
Mastering Autofill and other Excel shortcuts can boost your productivity. Try it out, and if something doesn’t work, revisit the steps or drop a comment for help!