If you’ve ever wanted to stay organized and productive, a checklist is your best friend. A dynamic Excel to-do list with checkboxes can help you manage a personal task list, track project deliverables, or simply keep track of your regular tasks. In this guide, you will learn how to create an interactive checklist in Excel, create Excel to-do list with checkboxes and how to keep yourself productive and organized by using a project to-do list Excel template.
Why Use Excel for Checklists?
Excel is more than a simple number-crunching application. It’s a powerful, flexible platform ideal for work tracking. You can easily adjust your daily checklist in Excel. You may also make it more interactive by using formulas, conditional formatting, and checkboxes. Another advantage of using Excel to create daily task checklists is that it is accessible on all platforms, and Excel project to-do list templates can save your time.
How To Make a Checklist In Excel? Step-by-Step Guide
To make an Excel checklist, you can follow these simple steps and organize your daily tasks easily.
Step 1. Set Up Your Basic Checklist
Before you create an interactive checklist in Excel, start with a simple task list. First, create a new file in Excel and then enter your data into columns. Then, format your headers by bolding the text. Next, list all of the tasks you want to track. After that, save your sheet before adding checkboxes so that you may retrieve it even if you mistakenly lose data.
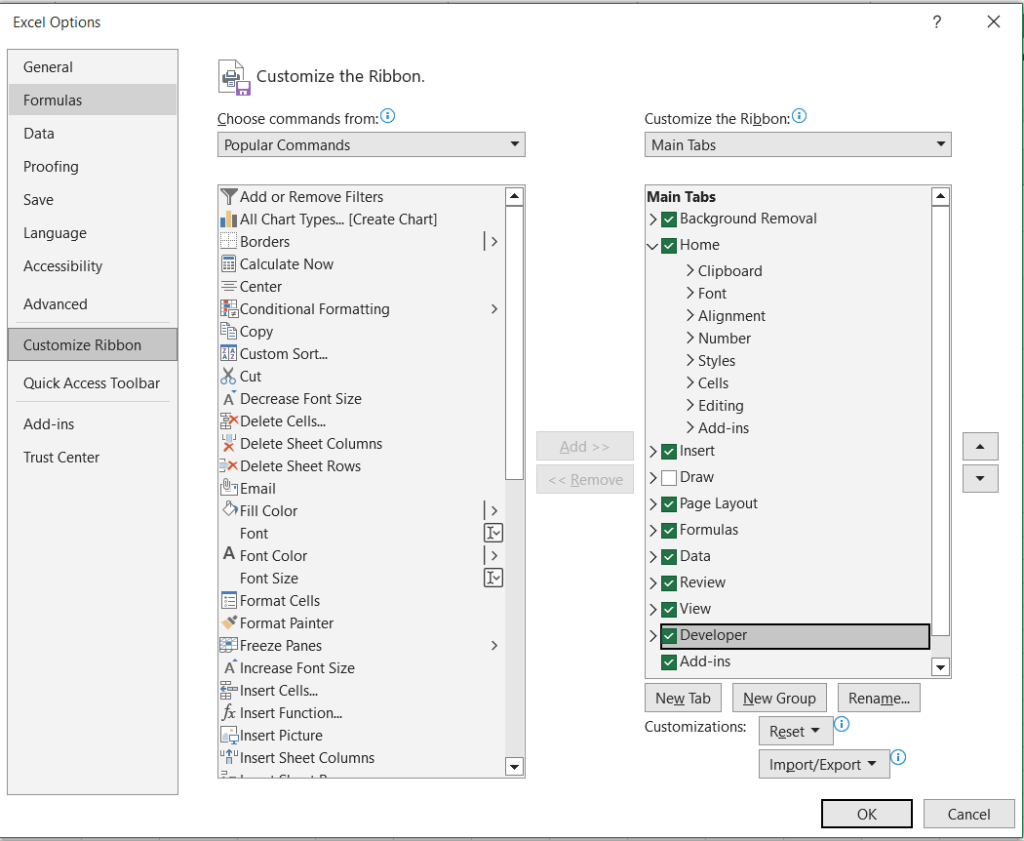
Step 2. Enable the Developer Tab
The checkbox feature is located in the Developer tab, which is not visible by default.
- Click on File, then choose Options, and navigate to Customize Ribbon in the menu.
- Check the box for Developer under the main tabs
- Click OK
Step 3. Insert Checkboxes
After displaying the Developer tab, the next step is to place check boxes in your data. Before inserting the checkboxes, ensure that your data is organized. After that, follow these steps.
- Click on the Developer tab.
- Select Insert > Form Controls > Checkbox.
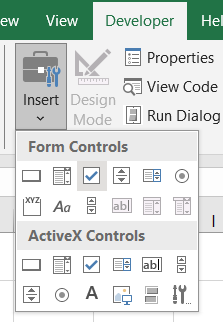
- Click on the cell where you want the checkbox.
- The checkbox will not appear exactly in the cell you select but will appear close to it. You can use your mouse to drag and drop it into the selected cell:
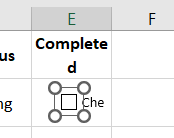
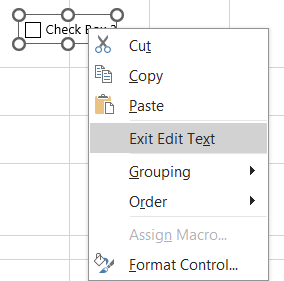
- The text “Checkbox 1” appears on the left side of the checkbox. You can remove it by right-clicking the cell and selecting “Exit Edit Text,” and then removing the text:
Step 4. Copy Checkbox to Other Cells
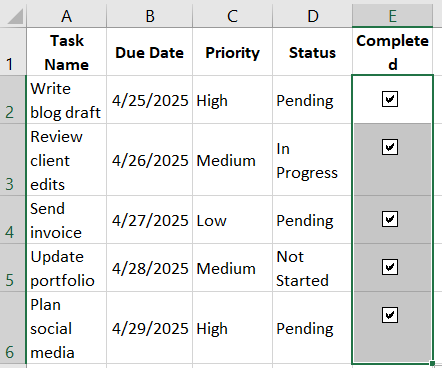
After that, drag it down with your cursor and position it in the lower right corner of the cell. Drag the cursor down to the final cell where you want to copy the checkboxes:
Step 5. Link Checkboxes to Cells
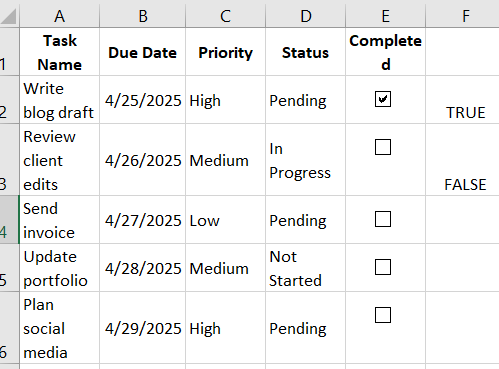
As you can see in the image above, the checklist is already complete, so why do this extra step? The reason for this is that Excel will not respond to the changes you have made unless the checkboxes are linked to cells.
- Right-click on a checkbox > Format Control:
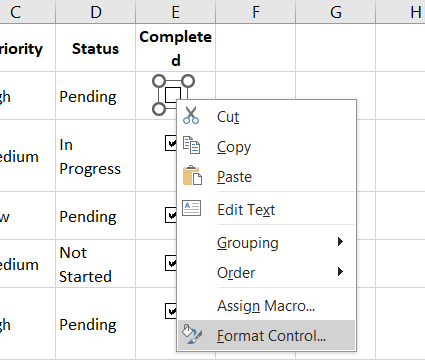
- Under Control, set the Cell Link to the cell you want to link to the checkbox. And then repeat the same steps for all other cells:
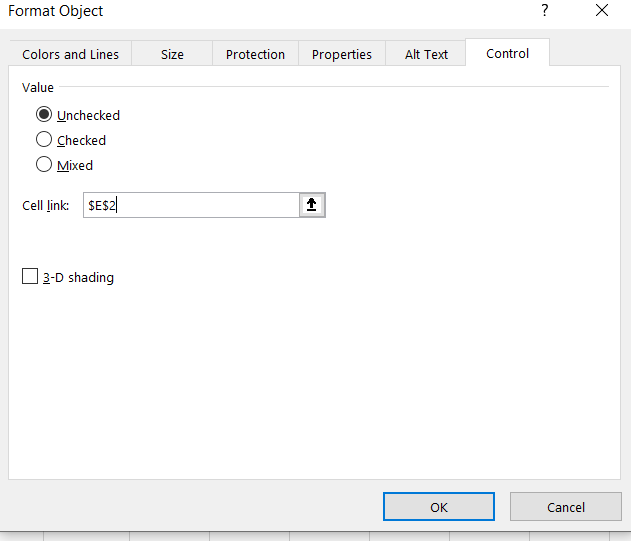
- This will return TRUE/FALSE when the checkbox is checked/unchecked:
Step 6. Hide Linked Cells
If these linked cells are making your data sheet appear cluttered, you can hide them by following these two steps.
- Right-click the linked column.
- Choose Hide
Now your checklist can dynamically update based on checkboxes.
Make Your Checklist Interactive with Conditional Formatting
As you know, typical to-do lists include a strikethrough feature. It creates a horizontal line through the center of the text.
If you want to create this effect in an Excel data sheet, you can easily do it by using conditional formatting.
- Select Your task column where you want to apply this effect.
- Go to Home > Conditional Formatting > New Rule and then choose “Use a formula to determine which cells to format”.
- And then enter the formula: =$F2=TRUE:
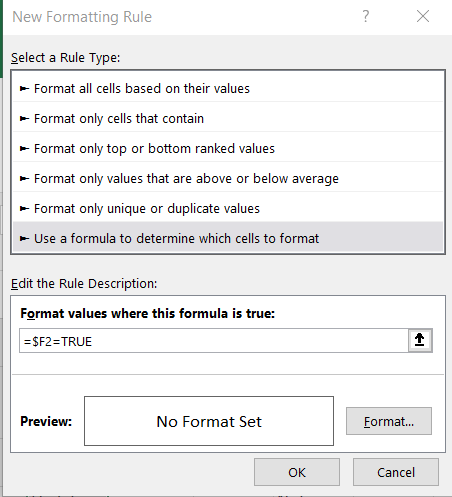
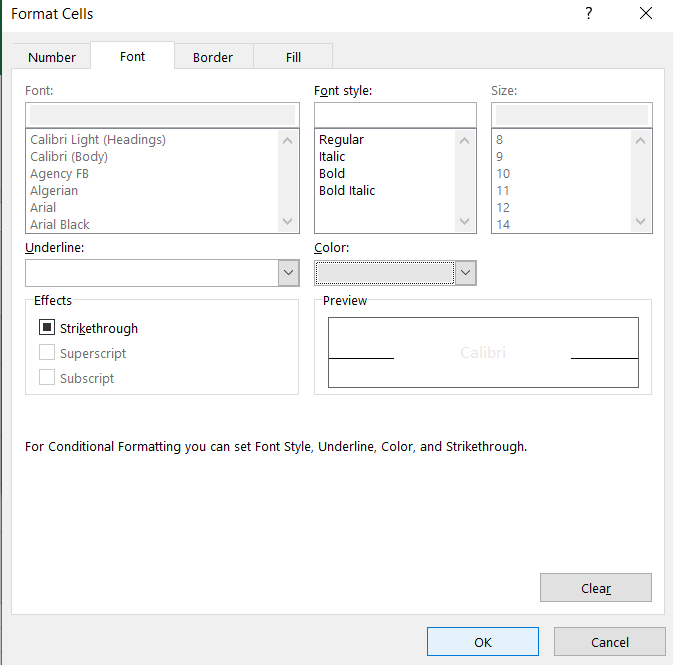
- Click Format
- Set Strikethrough text, change text color, or highlight the row as below.
- Now, whenever you check a column, the text will be formatted with a light grey color and strikethrough.
Bonus: Use a Pre-Made Excel Template To Do List
If you’re short on time or not confident in setting up a “to-do list” from scratch, Excel templates are a lifesaver. Here’s how to use them:
Step 1: Search for Templates
- Go to File > New
- In the search bar, type “to-do list” or “checklist.”
Step 2: Choose a Template
- Select a template that suits your needs
- Many project to-do list Excel templates include checkboxes, status tracking, and priority tags
Step 3: Customize It
- Change the categories, colors, or add columns
- Insert checkboxes if they’re not included already
Advanced Tips to Optimize Your Excel Checklist
Once you create an interactive checklist in Excel, try these pro tips:
- Data Validation for Priority Levels: Use dropdowns to select High, Medium, Low
- Dynamic Sorting: Sort tasks by due date or priority with filters
- Highlight Overdue Tasks: Use conditional formatting to mark overdue tasks based on today’s date
- Protect Cells: Lock the cells with formulas to prevent accidental editing
Excel To Do List With Checkboxes: Conclusion
If you want to stay organized and productive, making an Excel to-do list with checkboxes is an easy and effective approach. It allows you to visually track completed tasks, prioritize what is important, and manage your day with ease. With checkboxes, connected cells, and conditional formatting, your checklist becomes interactive and simple to maintain.
Whether you’re managing personal objectives, work duties, or team projects, Excel provides a flexible arrangement that can be tailored to your requirements. You can also highlight overdue items, filter by priority, and protect important cells to prevent unintentional changes.
If you don’t have much time, Excel’s built-in templates might help you get started quickly. Simply download, personalize, and you’re good to go.
Spend a few minutes creating your own Excel to-do list with checkboxes; it’s a little step but can lead to increased productivity and reduced stress every day.
FAQS
1. How can we add a checkbox in Excel?
To add checkboxes in Excel, just follow these simple steps. Open the Developer tab, then select Insert and pick the Checkbox option from the Form Controls section. After that, click on the cell where you’d like the checkbox to be placed.
2. Why is the Developer tab not showing in my Excel?
The reason you don’t see the developer tab is that it is hidden by default in Excel. You’ll need to enable it first. So, to accomplish that, go to File > Options > Customize Ribbon and check the box for Developer.
3. How can we link checkboxes to cells in Excel?
Your checkboxes will be temporary unless you link them to Excel cells. So, to link checkboxes to cells, right-click the checkbox, choose Format Control, then under the Control tab, set the Cell link to a cell. This cell will show TRUE/FALSE based on the checkbox status.
4. Is it possible to use conditional formatting with checkboxes?
Yes, you can apply conditional formatting based on checkboxes. First, link the checkboxes to cells, then use a conditional formatting rule like =$F2=TRUE to format the corresponding task (e.g., strikethrough completed tasks).
5. How can we copy checkboxes down a column?
After placing a checkbox in one cell, click on it to activate the sizing handles. Then drag the fill handle from the bottom-right corner downward to replicate the checkbox in the cells below. Keep in mind, each duplicated checkbox must be manually linked to its corresponding cell if you want them to function independently.
6. Are there templates for to-do lists in Excel?
Yes, go to File > New, search for “to-do list” or “checklist,” and choose from various ready-made templates that include features like checkboxes and priority tags.
7. Can we protect our checklist from being edited accidentally?
Yes, you can lock specific cells (like formulas or checkboxes) by using Excel’s Protect Sheet feature under the Review tab.